ParentShield Portal Guide
Here you will find all the information on the ParentShield Portal, how to use it and what all the different options do, so you can set it up exactly how you'd like it.
Press on the links below to jump to a section.
![]()
![]()
![]()
![]()
![]()
![]()
![]()
![]()
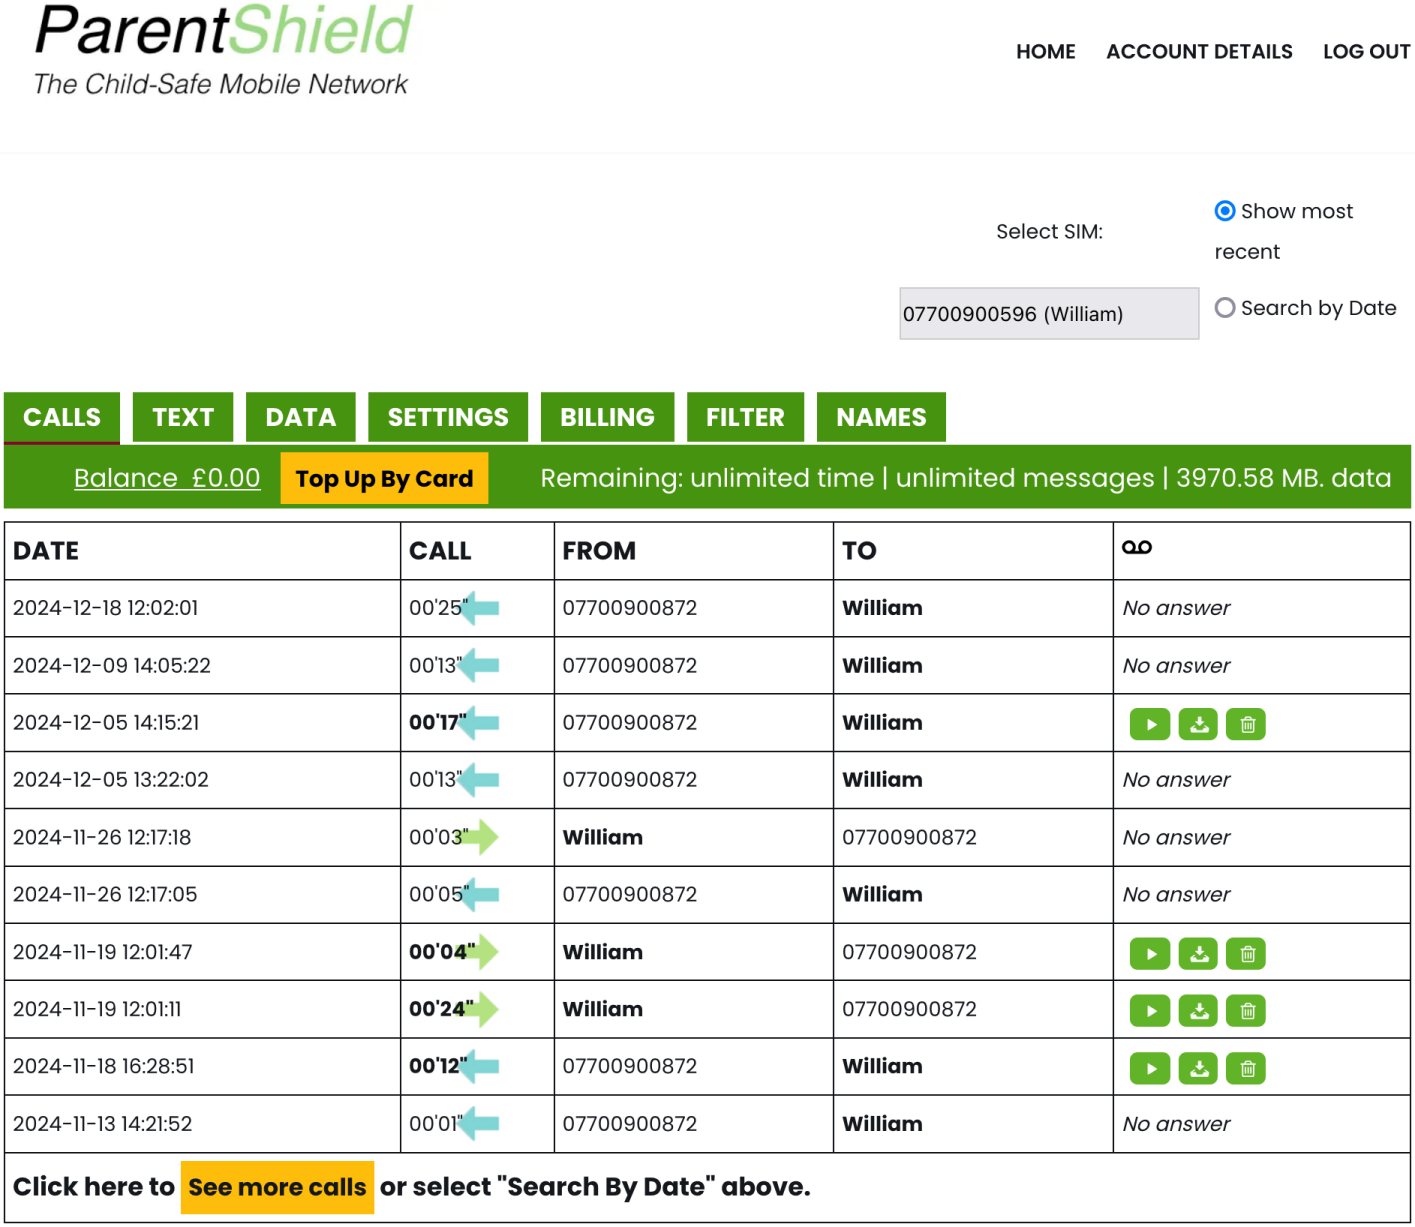
Once you've logged into the ParentShield Portal, the default screen is the Calls screen.
You can switch between the different screens using the tab rail.

If you have multiple SIMs on the account, you can switch between them using the selection box towards the top right.

You can change account details or log out using the links in the top right of the portal. You'll need to press on the menu icon first to access these on mobile.


If you need any support, there is a live chat icon in the bottom right you can press on. This is only shown when someone is available to chat, and in the majority of circumstances you will be chatting with a real human within 1 - 2 minutes.

Calls
The Calls screen will have a list of all the calls, with the most recent at the top. The date format is Year-Month-Day Hour:Minute:Second. You can listen to the call by pressing on the play button to the right. On a desktop computer (or by turning your phone sideways), you will see a couple more options to download the call recording or delete it.
You can even see calls that were not answered, and any blocked calls will be shown here with a reason as to why they were blocked.
The blue arrow indicates a call made to the ParentShield phone, and the green arrow indicates a call made from the ParentShield phone.
You can load more calls by pressing the see more calls button towards the bottom.

You can search for a date range by selecting the search by date option towards the top right, setting the date range towards the top left and pressing on the search date range button.

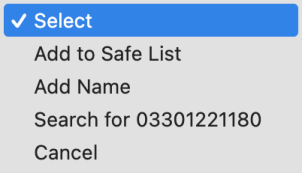
Pressing on a number in the call log will bring up a select box. If you press on this you will get a few more options. You can add the number to the block or safe list (depending on if you have ultra-secure mode on), add a name to more easily identify the number, or search for just calls to or from that number.

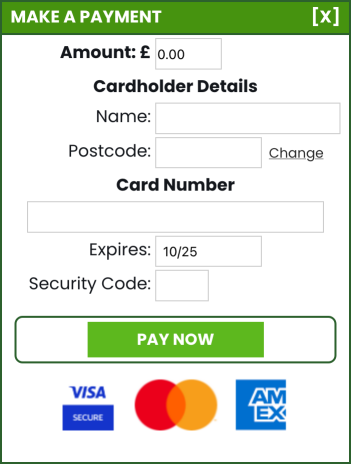
If you're using our All-Network Roaming SIM, are on a plan with a limited call allowance each month, and they run out, you can use the top up by card button to put some balance on the account. That will allow extra calls to be made at pay as you go rates and you will see the balance go down as extra calls are made. The two home numbers on the account can still be called free of charge when the allowance has run out, and calls to those numbers will not be taken from any cash balance on the account.

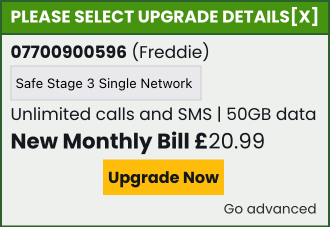
If you're using our EE-only SIM, the top up by card button will be replaced by an upgrade now button. There is no pay as you go facility available with the EE-only SIM.

Texts
The Text screen has a list of all the SMS messages to and from the phone with the most recent SMS messages at the top. The date format is Year-Month-Day Hour:Minute:Second. Any texts that were blocked will also be shown here with a reason as to why they were blocked. If a message is shown in red here, it has matched against the word alerts list you set in the Filter tab. The message will not have been blocked, but you will have been alerted that there is a text that has matched, as long as you have installed the app and set up push notifications.
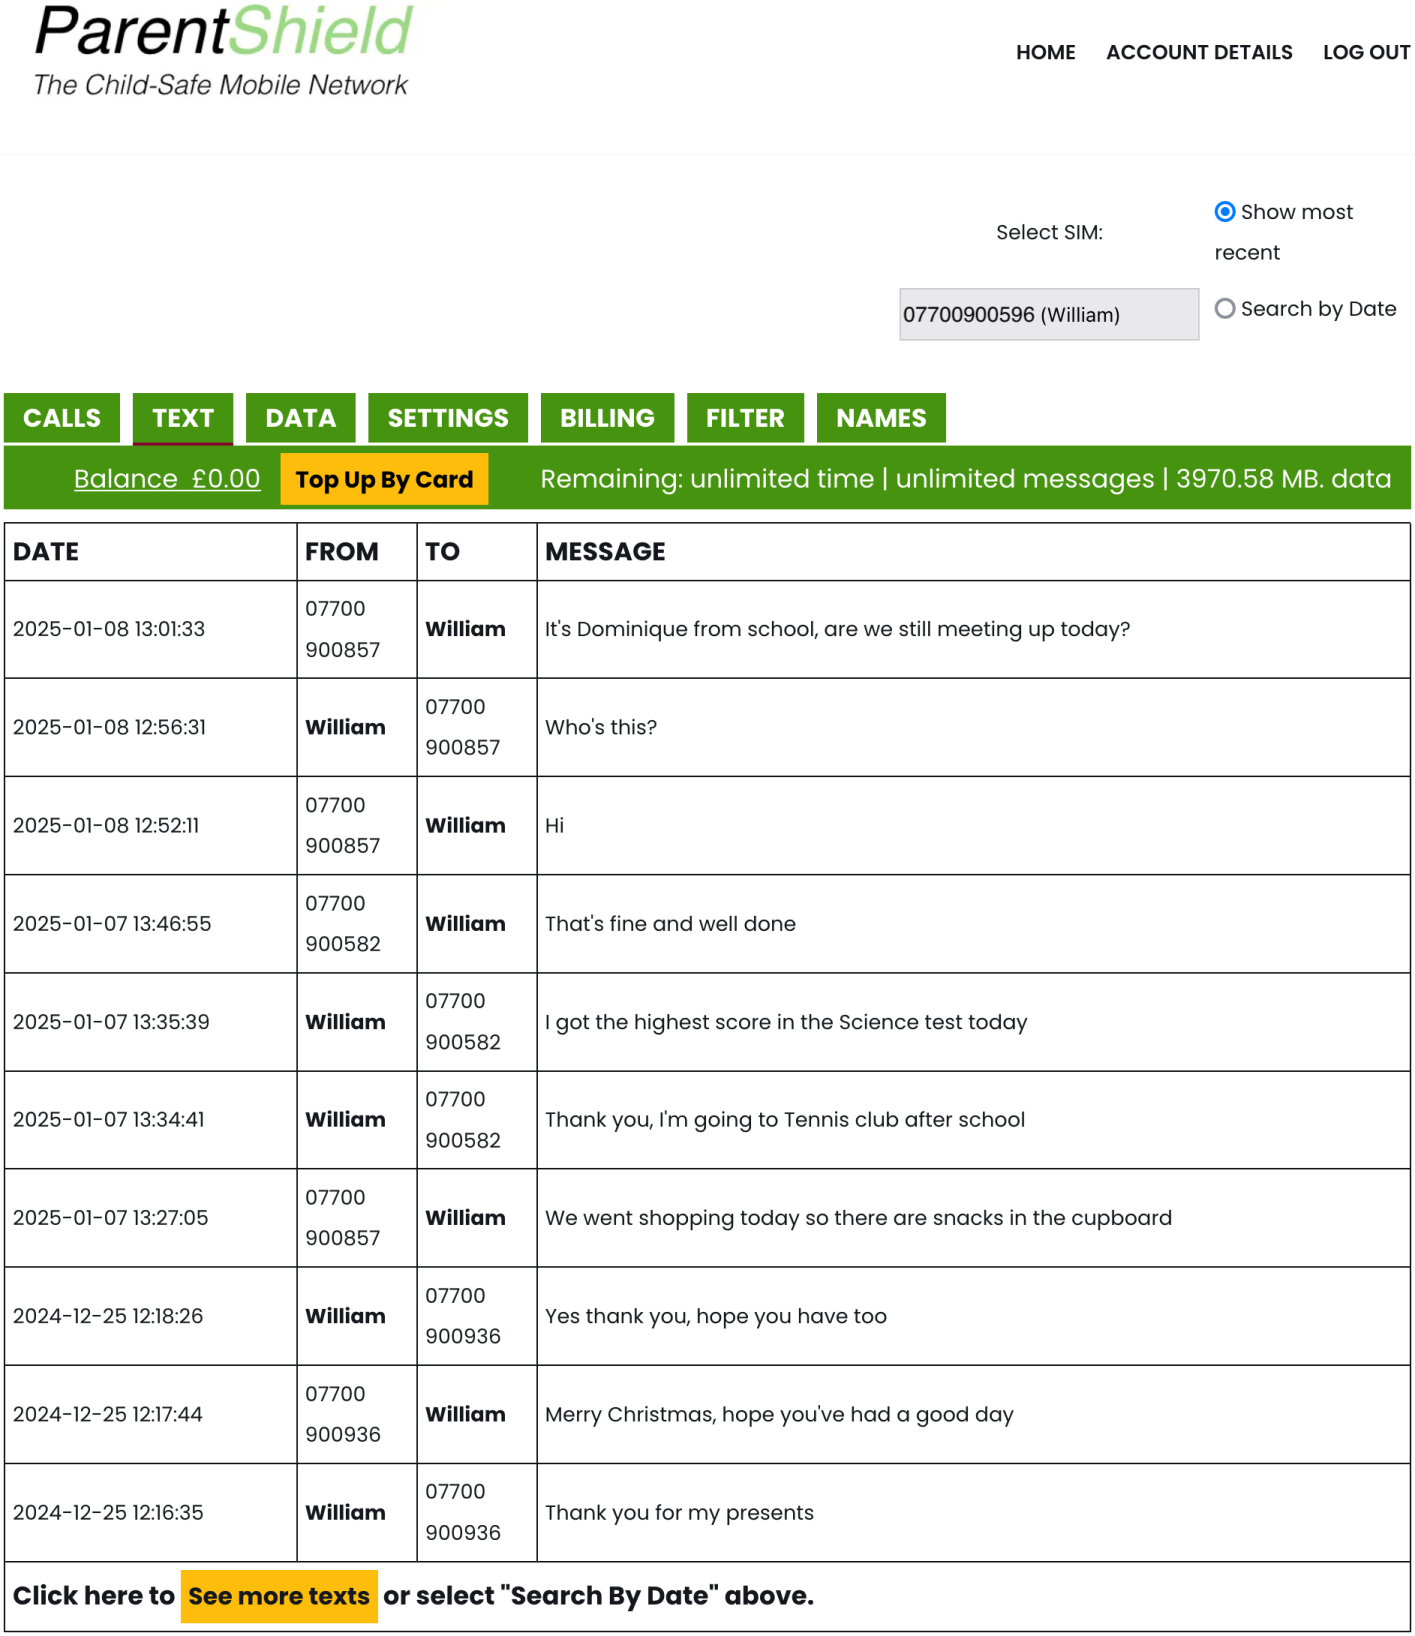
You can load more SMS messages by pressing the see more texts button towards the bottom.

As with the calls screen, you can search for a date range by selecting the search by date option towards the top right, setting the date range towards the top left and pressing on the search date range button.
If an SMS message has been blocked, you can forward the message to the phone by pressing on the green arrow button to the right of the message. Please note that this will re-send the message and it will appear to have come from the first home number. As home numbers are never blocked, this is the only way we can re-send the message and guarantee it is received correctly and not blocked again. This is usually used for blocked one time passcodes.

Pressing on a number in the text log will bring up a select box. Pressing on this will show you a few more options. You can add the number to the block or safe list (depending on if you have ultra-secure mode on), add a name to more easily identify the number, or search for just SMS messages to or from that number.
If you're using our All-Network Roaming SIM, are on a plan with a limited SMS allowance each month, and they run out, you can use the top up by card button to put some balance on the account. That will allow extra SMS messages to be sent at pay as you go rates and you will see the balance go down as extra SMS messages are sent. The two home numbers on the account can still be sent SMS messages when the allowance has run out, and messages to those numbers will not be taken from any cash balance on the account.
If you're using our EE-only SIM, the top up by card button will be replaced by an upgrade now button. There is no pay as you go facility available with the EE-only SIM.
Mobile Data
The Data screen has an on and off switch for mobile data, a data budgeting switch (on the All-Network Roaming SIM), and a data usage graph. The data on and off switch controls whether mobile data is allowed at the mobile network level, it does not affect whether mobile data is enabled on the phone
The data budgeting, available on the All-Network Roaming SIM, switch splits the monthly data allowance into a daily allowance, so they can't use all the data allowance up in one go. The data in the budget is recalculated at midnight each day, so if they haven't used all their daily allowance, the whole allowance will be split again across the remaining days until the next bill and they will have more to use each day. Additionally, if they have used all their daily allowance, you can switch the data budgeting switch off and back on, and that will recalculate the allowance, giving more to use from the total allowance straight away, but less data to use across the remaining days until the next bill.
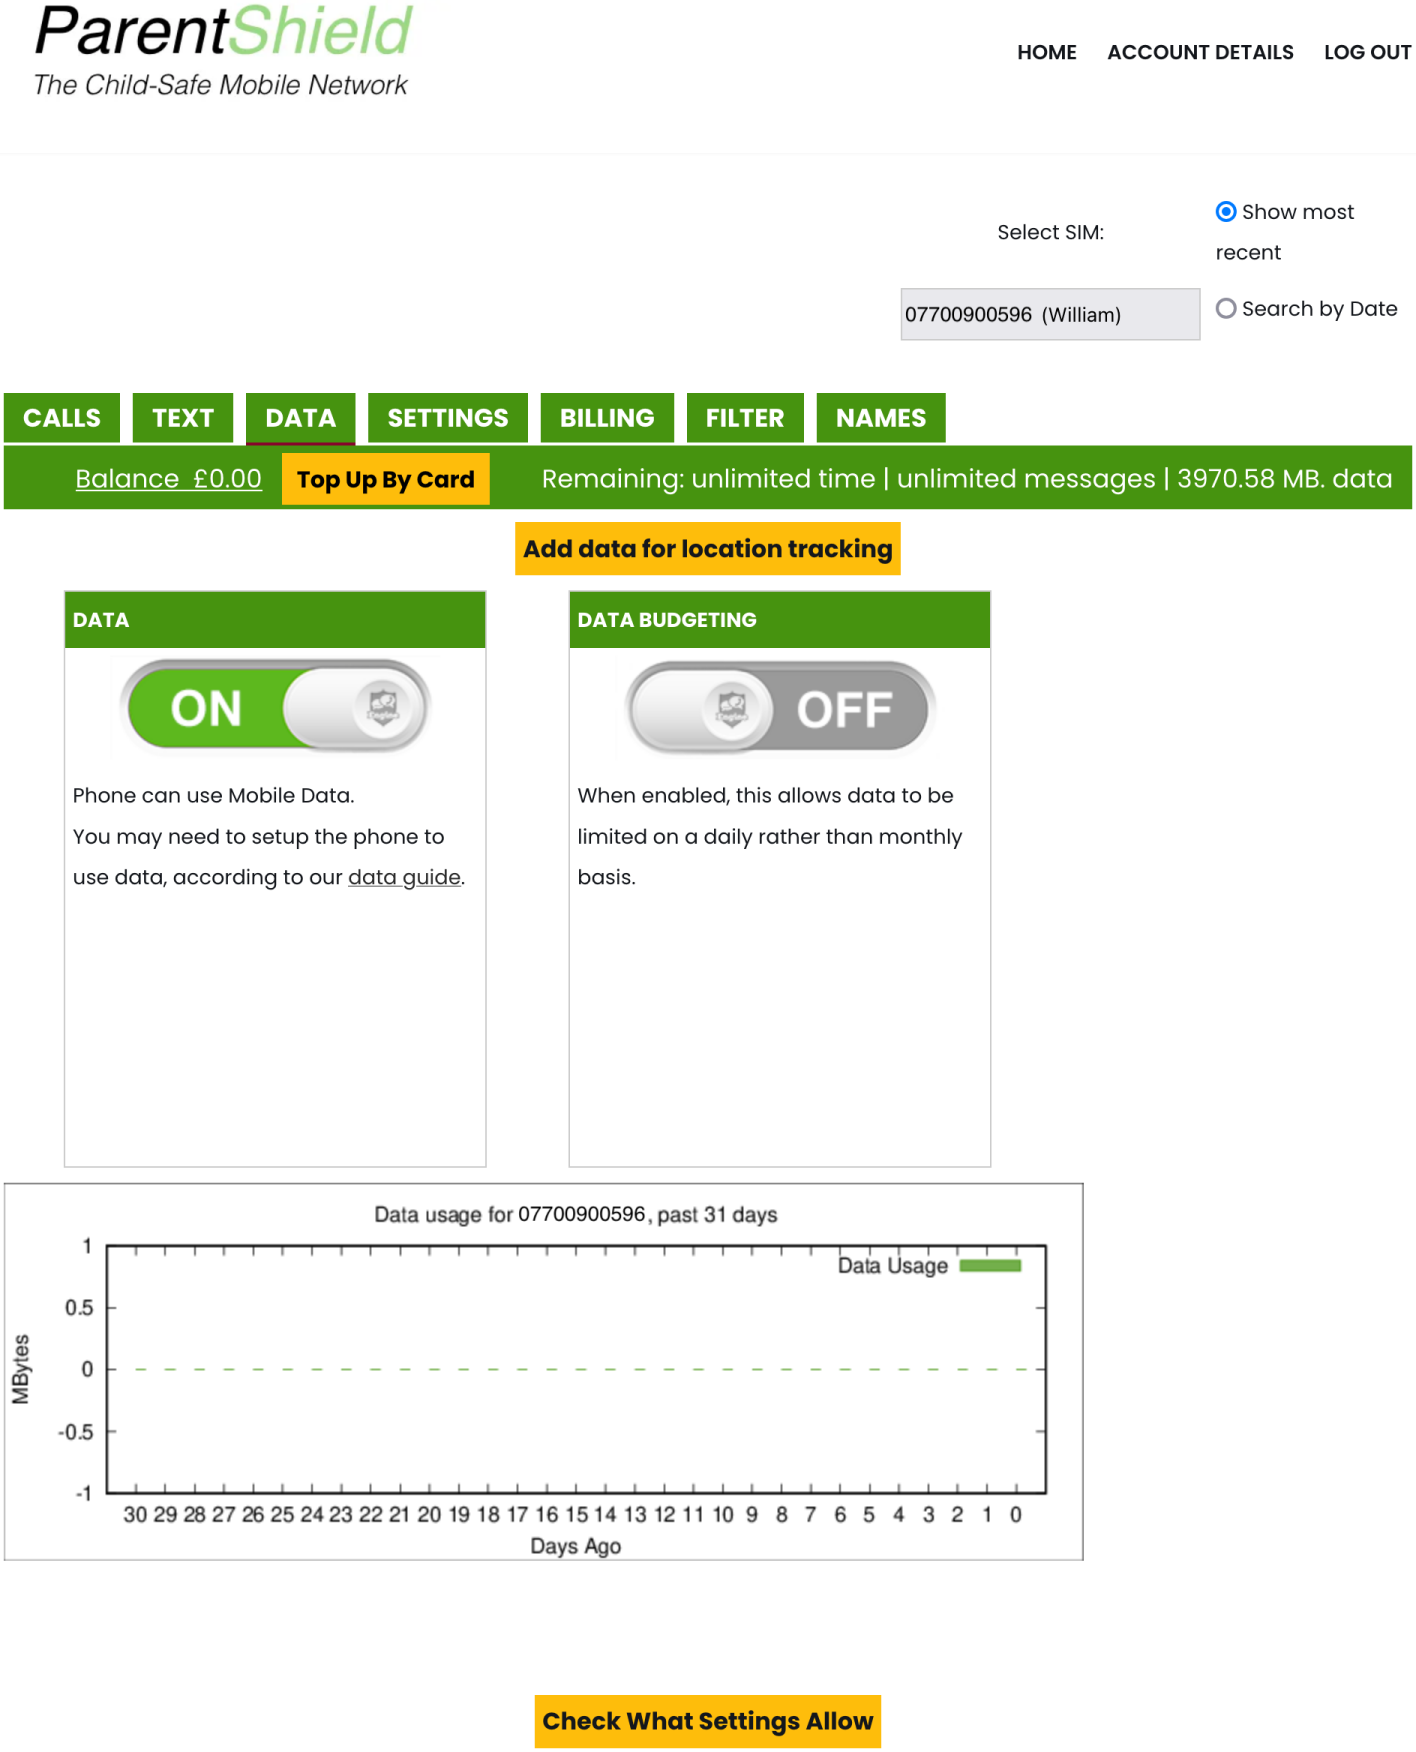
The phone may require some manual set up before mobile data will work. There is a guide to setting that up here.
If you're on our All-Network Roaming SIM, and you're on a plan without any inclusive mobile data allowance each month, you can still give them some data to use by switching the mobile data switch on, topping the account up and using at pay as you go rates. When you top up, it won't show as a data allowance on the account, but you will see the balance go down as data is used from it. Please note that the balance on the account is also used for additional calls or texts over allowances if those are used up.
On the All-Network Roaming SIM, if you're on a plan with an inclusive mobile data allowance, we offer extra mobile data to be used for location tracking purposes with a separate app (like Google Family Link or Apple Family Sharing) when the allowances have been used. When their mobile data has all been used, an add data for location tracking button will appear at the top of the data screen. That will add 10mb onto their data allowance, and can be used every half hour. If you have data budgeting switched on, then this button will take 10mb from their total monthly allowance but will add 10mb free of charge if they have used their whole monthly allowance up.
![]()
Settings
The Settings screen is where you can change all the SIM settings and there are quite a few things in here! It's well worth looking through the different options and reading what they all do. If you're ever unsure why something isn't working or is being blocked, there is a check what settings allow button at the very bottom of this page which will give you an overview of all the settings and if a setting might be blocking something.
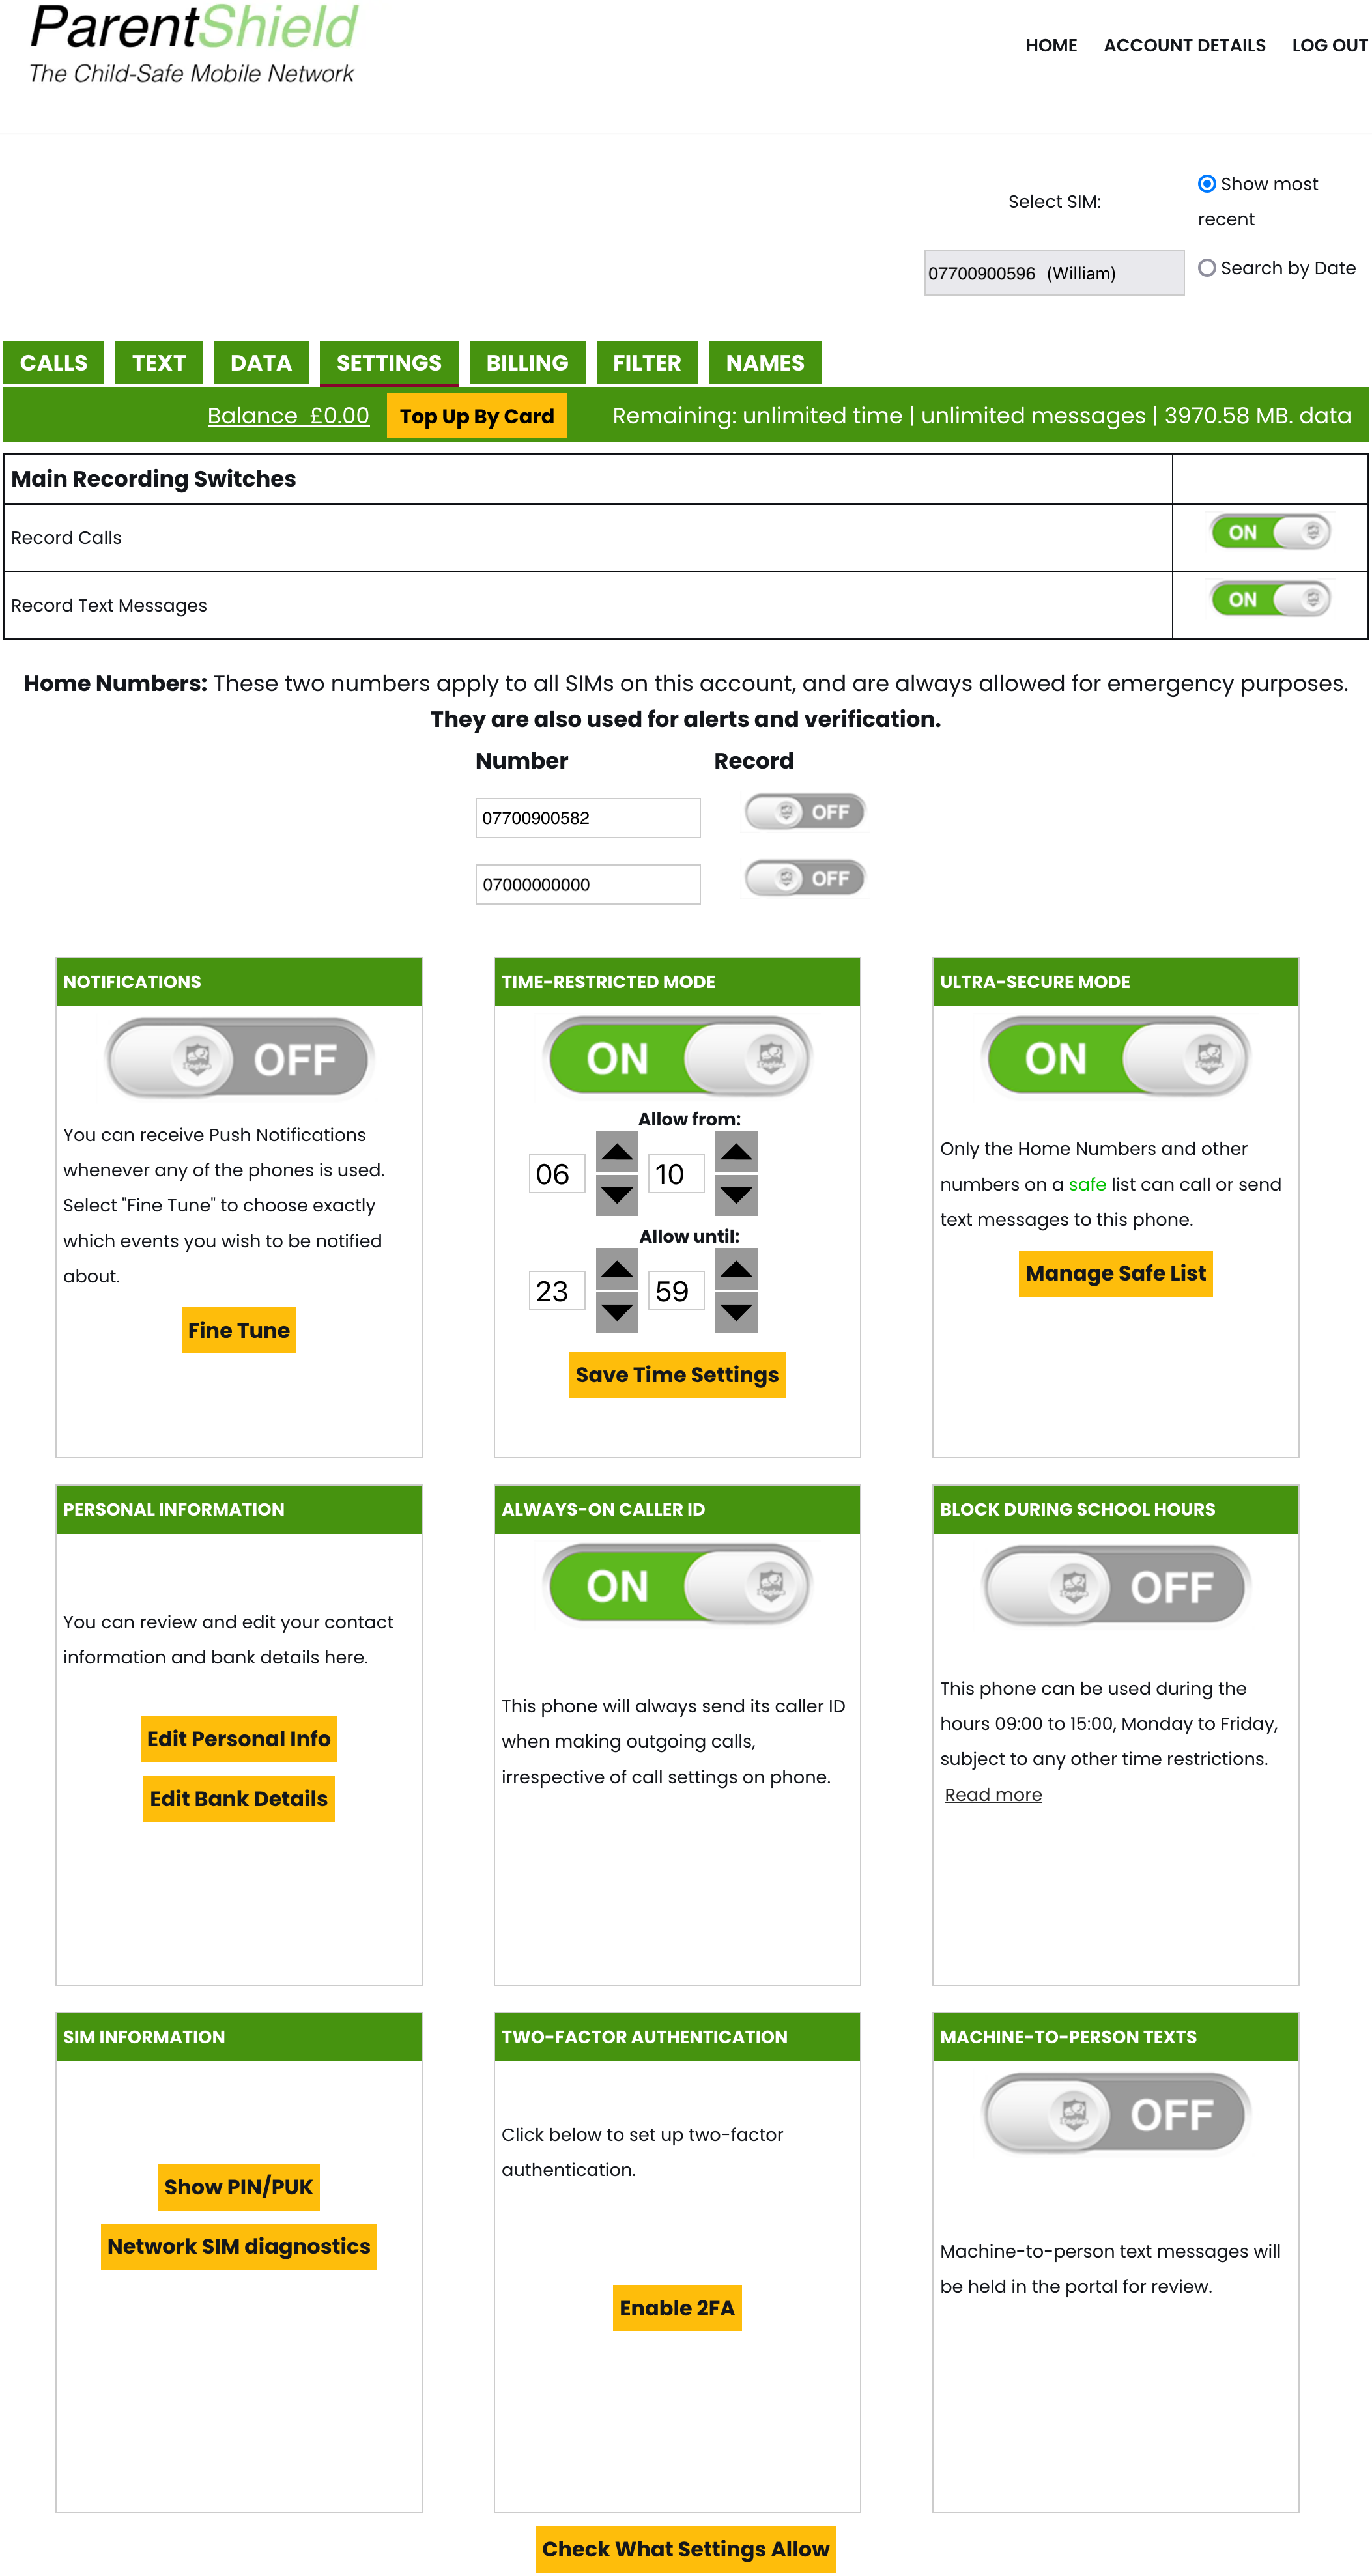
Main recording switches
The very top of the page has the main recording switches. This controls whether all calls and SMS messages are recorded and visible, and you can switch these on or off as you please. Even if you switch the recording facilities off, you can still see an itemised list of the calls and SMS messages with the dates and phone numbers, but will not be able to listen to the call or read the SMS messages. Please note that any previously recorded, or unrecorded, calls or SMS messages will stay as they were after changing the recording settings.

Home numbers
Just underneath there are the two home numbers. These two numbers are account-wide, rather than per SIM. The home numbers are emergency contacts (usually the parents or guardians), and are always allowed regardless of any restrictions set in the Settings tab, and will continue to work even if all the call or SMS allowances have been used. These two numbers are also presumed to have some authority over the account unless we're told otherwise. You can switch recording for these two numbers on or off as needed. The first home number can only be changed by getting in contact with ParentShield in case your account is compromised, and the second home number can only be changed once every 30 days to prevent abuse of the free calls and SMS to emergency contacts over allowances.

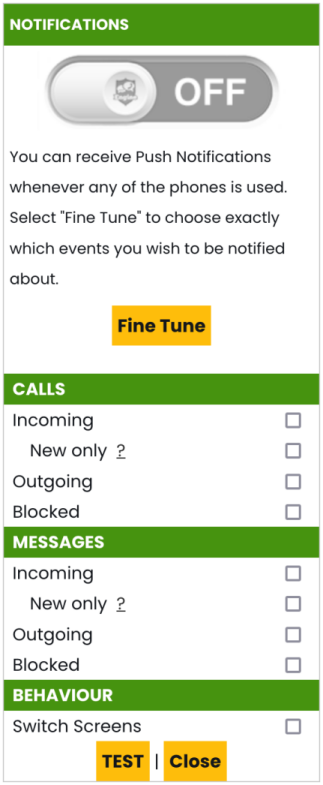
Push notifications
The next option is a switch for push notifications. You will need to have install the ParentShield Portal as an app to your phone in order to enable this. Once enabled, you can press the fine tune button underneath to adjust what you are notified on, and there is a button to test your notifications are working. The incoming and outgoing switches should be fairly obvious on what they notify on. The new only switch will notify you only when they are contacting someone they haven't contacted in the last 6 months, and the blocked switch will notify on blocked calls or SMS. The switch screens option adjusts whether you are taken to the relevant screen in the ParentShield Portal when you press on a notification that comes through.
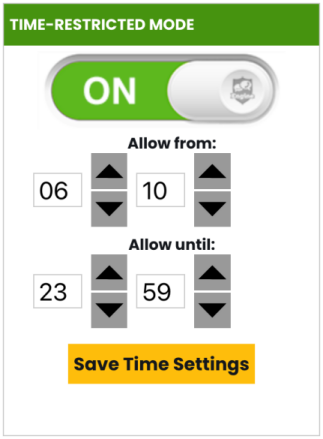
Time-restricted mode
Time-restricted mode allows you to set the times you want to allow calls, texts and mobile data to work. This will not stop the phone from working entirely, or switch the phone off, it will just stop calls, texts and mobile data from working. You set the time you want to allow from and until, and press on the save time settings button. The times you set to allow the phone between here will apply for every day.
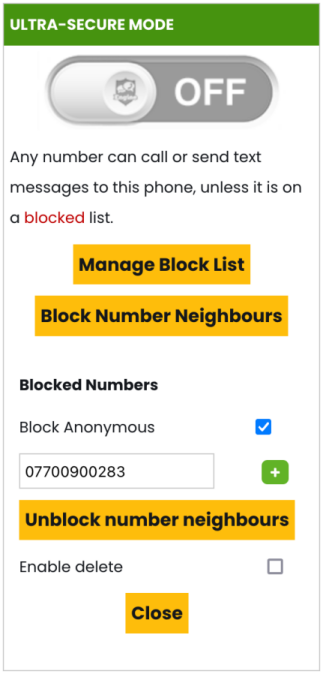
Ultra-secure mode
With ultra-secure mode switched off, you will see two buttons to manage the block list and to block number neighbours. The block number neighbours button will block 10 numbers either side that are next to their phone number in sequence. For example, if their phone number is 07700 900880, this will block numbers from 07700900870 through to 07700900890. It is common for children to contact their number neighbours, so you may want to block these.
In the manage block list section, there is a switch to block anonymous or withheld calls from coming through, and a section to add a number manually to the block list. If you need to delete a number from the block list, you can switch on the enable delete option and a red bin icon will appear next to each number.
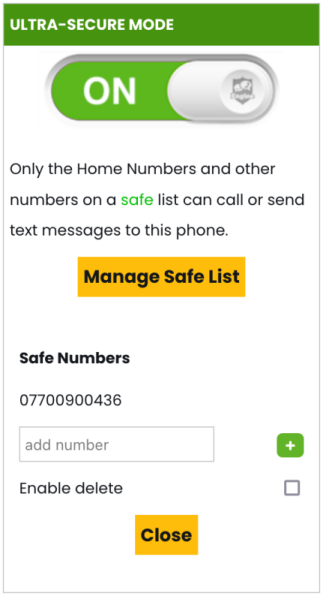
If you switch ultra-secure mode on, this will then block all numbers except for the two home numbers and any numbers you add into the safe list. With ultra-secure mode on, you will see that the manage block list and block number neighbours buttons disappear and are replaced with the manage safe list button. This works similarly to the block list, except it is for adding phone numbers you want to allow contact with.
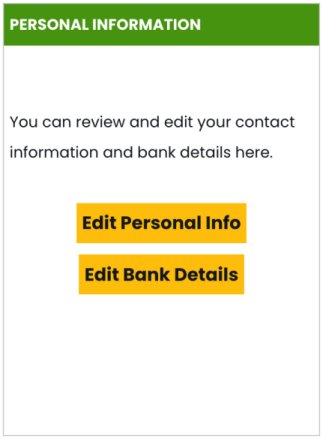
Personal information
The edit personal info button will take you to a page that will let you change your contact name, address, contact phone number, security question and answer, and see your payment details. The edit bank details button will take you to the Billing tab where you can change your tariff, see your most recent invoices, change your payment details if paying by Direct Debit.
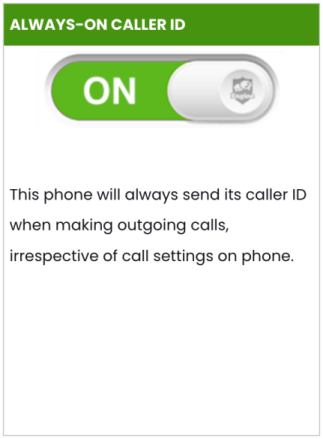
Always-on caller ID
Always-on caller ID is an option that will let you allow or disallow the phone to withhold its number when calling someone. With this switched on, it will always show its caller ID even if it is set to be withheld on the phone or a number is called with the 141 withhold caller ID prefix.
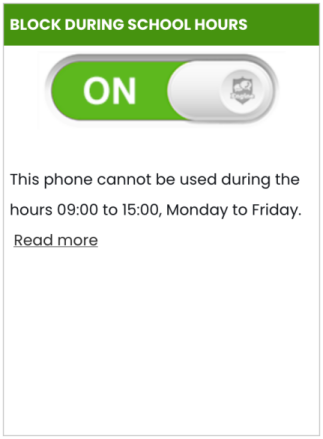
School-block
The next option is block during school hours. When switched on, this will block calls, SMS messages and mobile data use between 9am and 3pm Monday to Friday. The two home numbers are exempt from any restrictions, those two numbers will still be contactable.
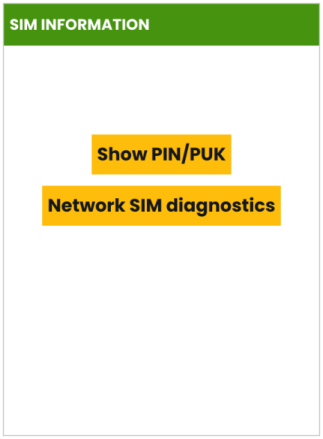
PIN / PUK and network SIM diagnostics
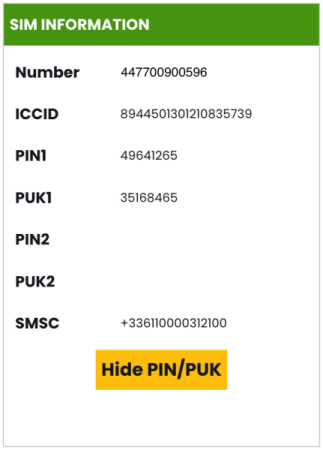
The show PIN / PUK button will display the SIM PIN and PUK codes, as well as the SMSC.
There is an option on every phone to enable the SIM PIN, which locks the SIM card with a PIN. This stops the SIM from being used until the correct SIM PIN is entered. The SIM PIN is pre-set to the number you see here. If the SIM PIN is switched on, and entered incorrectly 10 times, this will lock the SIM card completely and you'll need to enter the PUK code to unlock it. We generally recommend keeping the SIM PIN switched off on the phone, but it is common for users to play about with settings on the phone, so these may be needed. The SMSC is the message center number that is used to send SMS messages. As mentioned, some users play about with settings on the phone, so they may change this number and stop themselves from sending SMS messages. If this is the case, you'll need to set the SMSC again on the phone. When you do this, you'll need to enter the SMSC exactly as shown including the +.
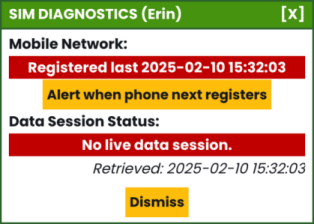
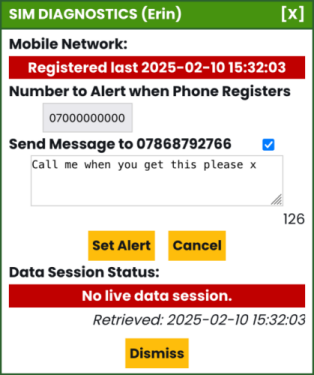
On the All-Network Roaming SIM, there is also a network SIM diagnostics button here. This button will query the SIMs connection status on the network and show you whether it's connected or not. If the SIM is not connected, there will be an alert when phone next registers button. Pressing this will allow you to receive an alert to your phone when the SIM connects to a network again, and will also let you send an SMS message to the phone. This can be used if the phone has been switched off or the battery has run out to send a text message and alert you straight away when the SIM reconnects.
Cell-Tower Tracking
For tracking a 4G feature phone, or a smartphone that has had its location tracking turned off, we offer cell-tower tracking. This will show the last cell-tower the phone connected to with a mobile data session, and a rough connection radius around the cell-tower. This is only available on plans with mobile data, and will require a recent mobile data connection.
This is particularly useful for 4G feature phones that have no built-in GPS, so accurate location tracking with a location tracking app is not available. If you don't want mobile data to be available all the time, but still wish to use this feature if need-be, you can keep the mobile data switched off in the portal until you need to find the last cell-tower the phone connected to. When you do, switch the mobile data on, wait 5 minutes, press the find cell tower button, then switch the mobile data back off again.
This also shows the MCC, MNC, Cell ID and LAC. This information can be passed to the police in the event of a missing persons report.

![]()
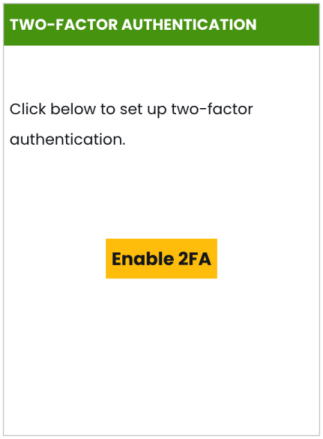
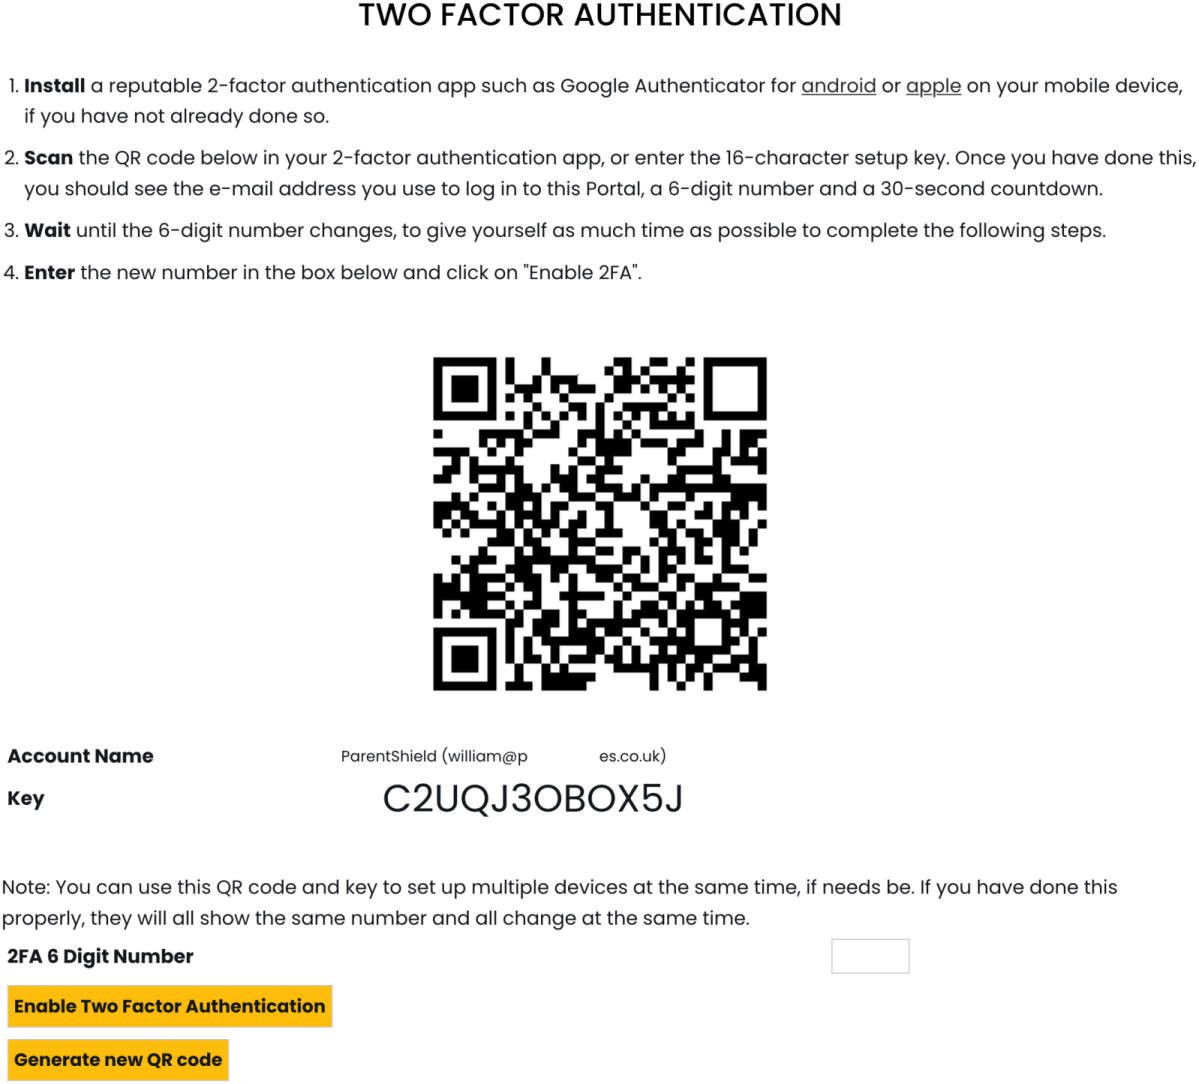
Two-factor authentication
You can enable two-factor authentication using the enable 2FA button. You will need a 2-factor authentication app installed such as google authenticator in order to set this up. This will require you to enter a code from your 2-factor authentication app when logging into the ParentShield Portal for extra security. There are detailed instructions on how to set this up after pressing the enable 2FA button.
Machine to person texts (one-time passcodes)
The last option is a switch for whether to allow machine to person texts. These are messages that are sent by a machine to the SIM. Most of the time these are one time passcodes that are sent as an SMS message when signing up for services like WhatsApp, or when logging into a banking app. This is switched off by default to help prevent the user from signing up to things like WhatsApp and other services and gaining access to unmonitorable communications. The messages will be blocked and will not be received by the phone, but you will be able to see the messages in the Texts tab in the ParentShield Portal. Scammers and spammers also often send SMS messages from a machine, so this can also stop those. If you want to allow one time passcodes SMS messages to go straight through to the phone without intervention you can switch this on.

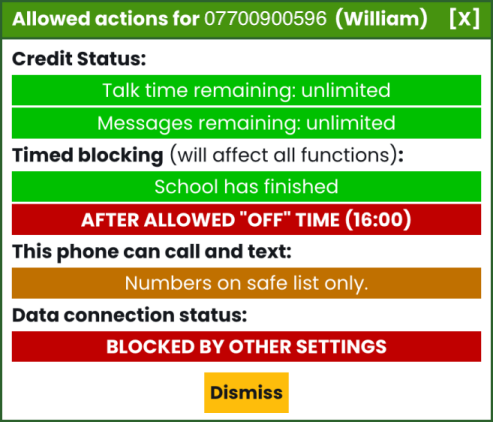
Check what settings allow
As there are many controls available, if you're ever unsure why something is being blocked, or just want an overview of the settings, you can press on the check what settings allow button at the bottom. You will then see a pop up showing the allowances, any timed blocking features, the ultra-secure mode setting, and whether a mobile data connection is active. If an option is in green it means that it is allowed, if it's orange it means it's allowed under certain circumstances (e.g. if you have ultra-secure mode on, numbers on the safe list will be allowed), and if it's red it means it is blocked.

Billing
This screen is where you can change your tariff, see your invoice history, and change your payment information if you're paying by Direct Debit.
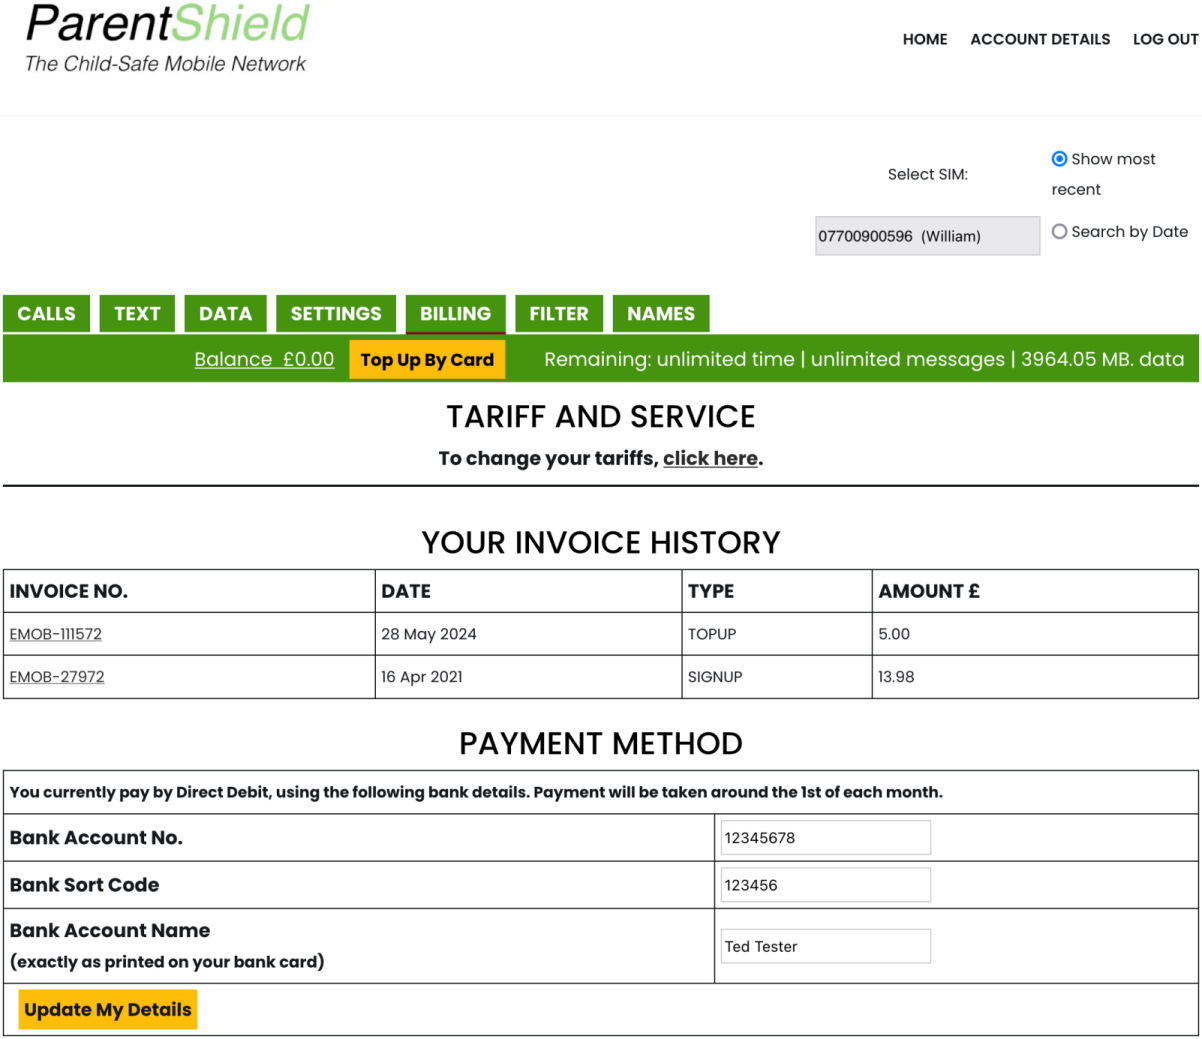
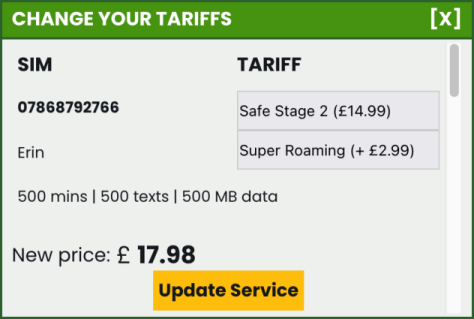
To change your tariff, press on the to change your tariff, click here link towards the top of the page. This will bring up a pop up box showing each SIM on the account and the tariff they are currently on. You can also enable or disable super roaming here for each SIM. On the All-Network Roaming SIM, Super roaming is available which sets the SIM to connect to the network with the strongest signal available at all times, without any particular preference. If you change your tariff here, make sure to press the update service button. The tariff change will take effect at the next billing date, which you can also see if you scroll to the bottom of this pop up box.
The invoice history shows your most recent monthly bills from top to bottom, as well as any top up you've made. You can click on the invoice number to see a paper copy of the invoice that you can print out if you wish.

Lastly, if you're paying by Direct Debit, you can see when the payments are collected and change your payment information at the bottom of the page.
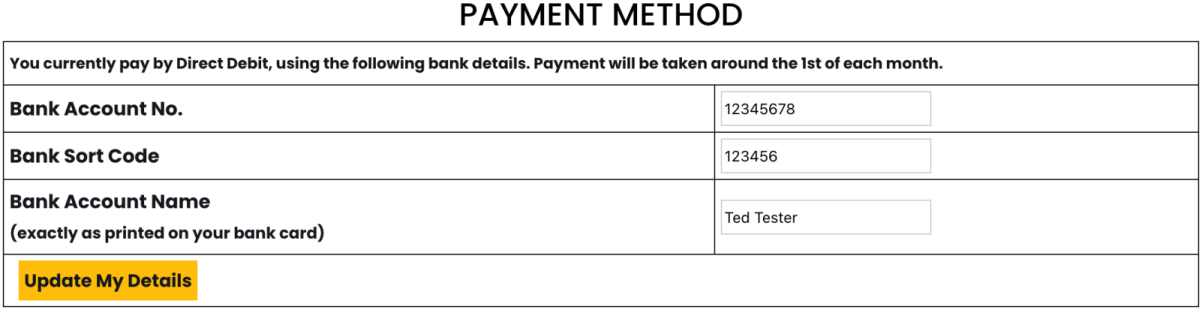
If you are paying by repeat card authorisation, you will not be able to change your payment information here. You can change the card that is used for your monthly payments by pressing on the top up by card button in the tab rail and making a payment of £1. The card that is used for monthly payments is always the last one that was used on the account (i.e. for a top up). If you have a Direct Debit set up and have also made a card payment for a top up, the Direct Debit is preferred so those details will be used for the monthly billing.
Word alerts
This next page tab is the word alerts and word filter tab. This is a very powerful feature that will let you set a list of words, or patterns using Regex, to be alerted to if they are used in an SMS message to or from the phone. This is usually used to set a list of any concerning words you'd want to be notified on.
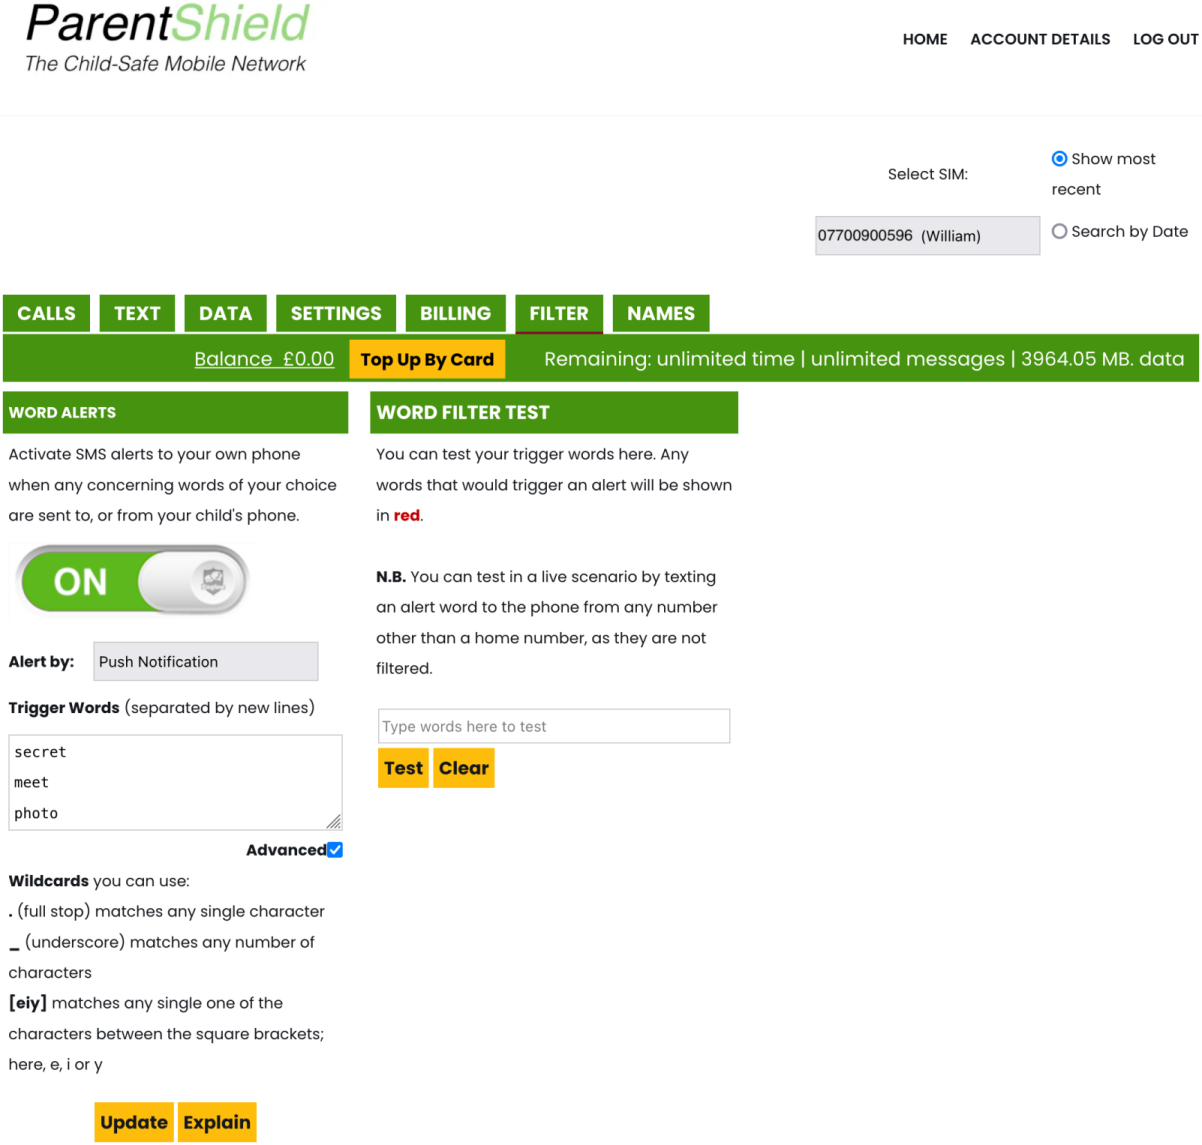
If you want to use this feature, turn on the word alerts switch and select how you want to be alerted (by SMS message or push notification). We'd recommend installing the ParentShield Portal as an app and setting the alert by option to push notification. If you're alerted by SMS message, you will receive only one SMS alert per hour, whereas push notifications are not limited at all. Then set a list of trigger words you'd want to be alerted to. If you're unsure on the words to set, we usually recommend keeping an eye on the sorts of conversations that are taking place by SMS or phone calls, and you will get a decent idea of what words to set. Once you've set some words, you'll need to press the update button to save the changes. Please note, you'll need to type each word on a new line.
The advanced switch will allow you to use Regex pattern matching for words. There are a few short tooltips for wildcards that can be used. For most users, we'd recommend keeping advanced switched off and simply typing in a list of different words each on a new line. If you'd like to learn Regex (not for the faint of heart), there are many resources that can be found online for learning it.
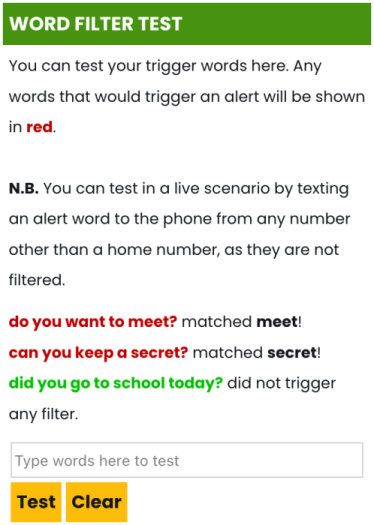
Home numbers never trigger the word filter alerts, as those are emergency contacts (usually the parents or guardians), you don't need to be alerted for those numbers. For this reason, there is also a testing panel on the page where you can type in a message and press the test button to see whether that message would trigger an alert in a real scenario.
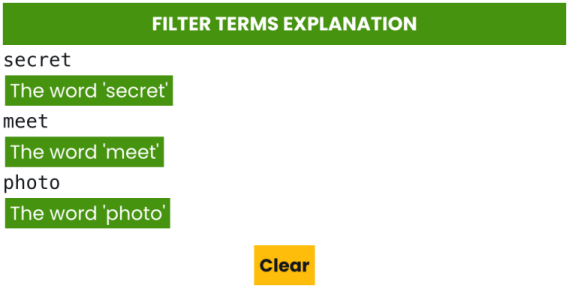
If you need an explanation on the trigger words you have set and what they will match against, tick the advanced option then press on the explain button.
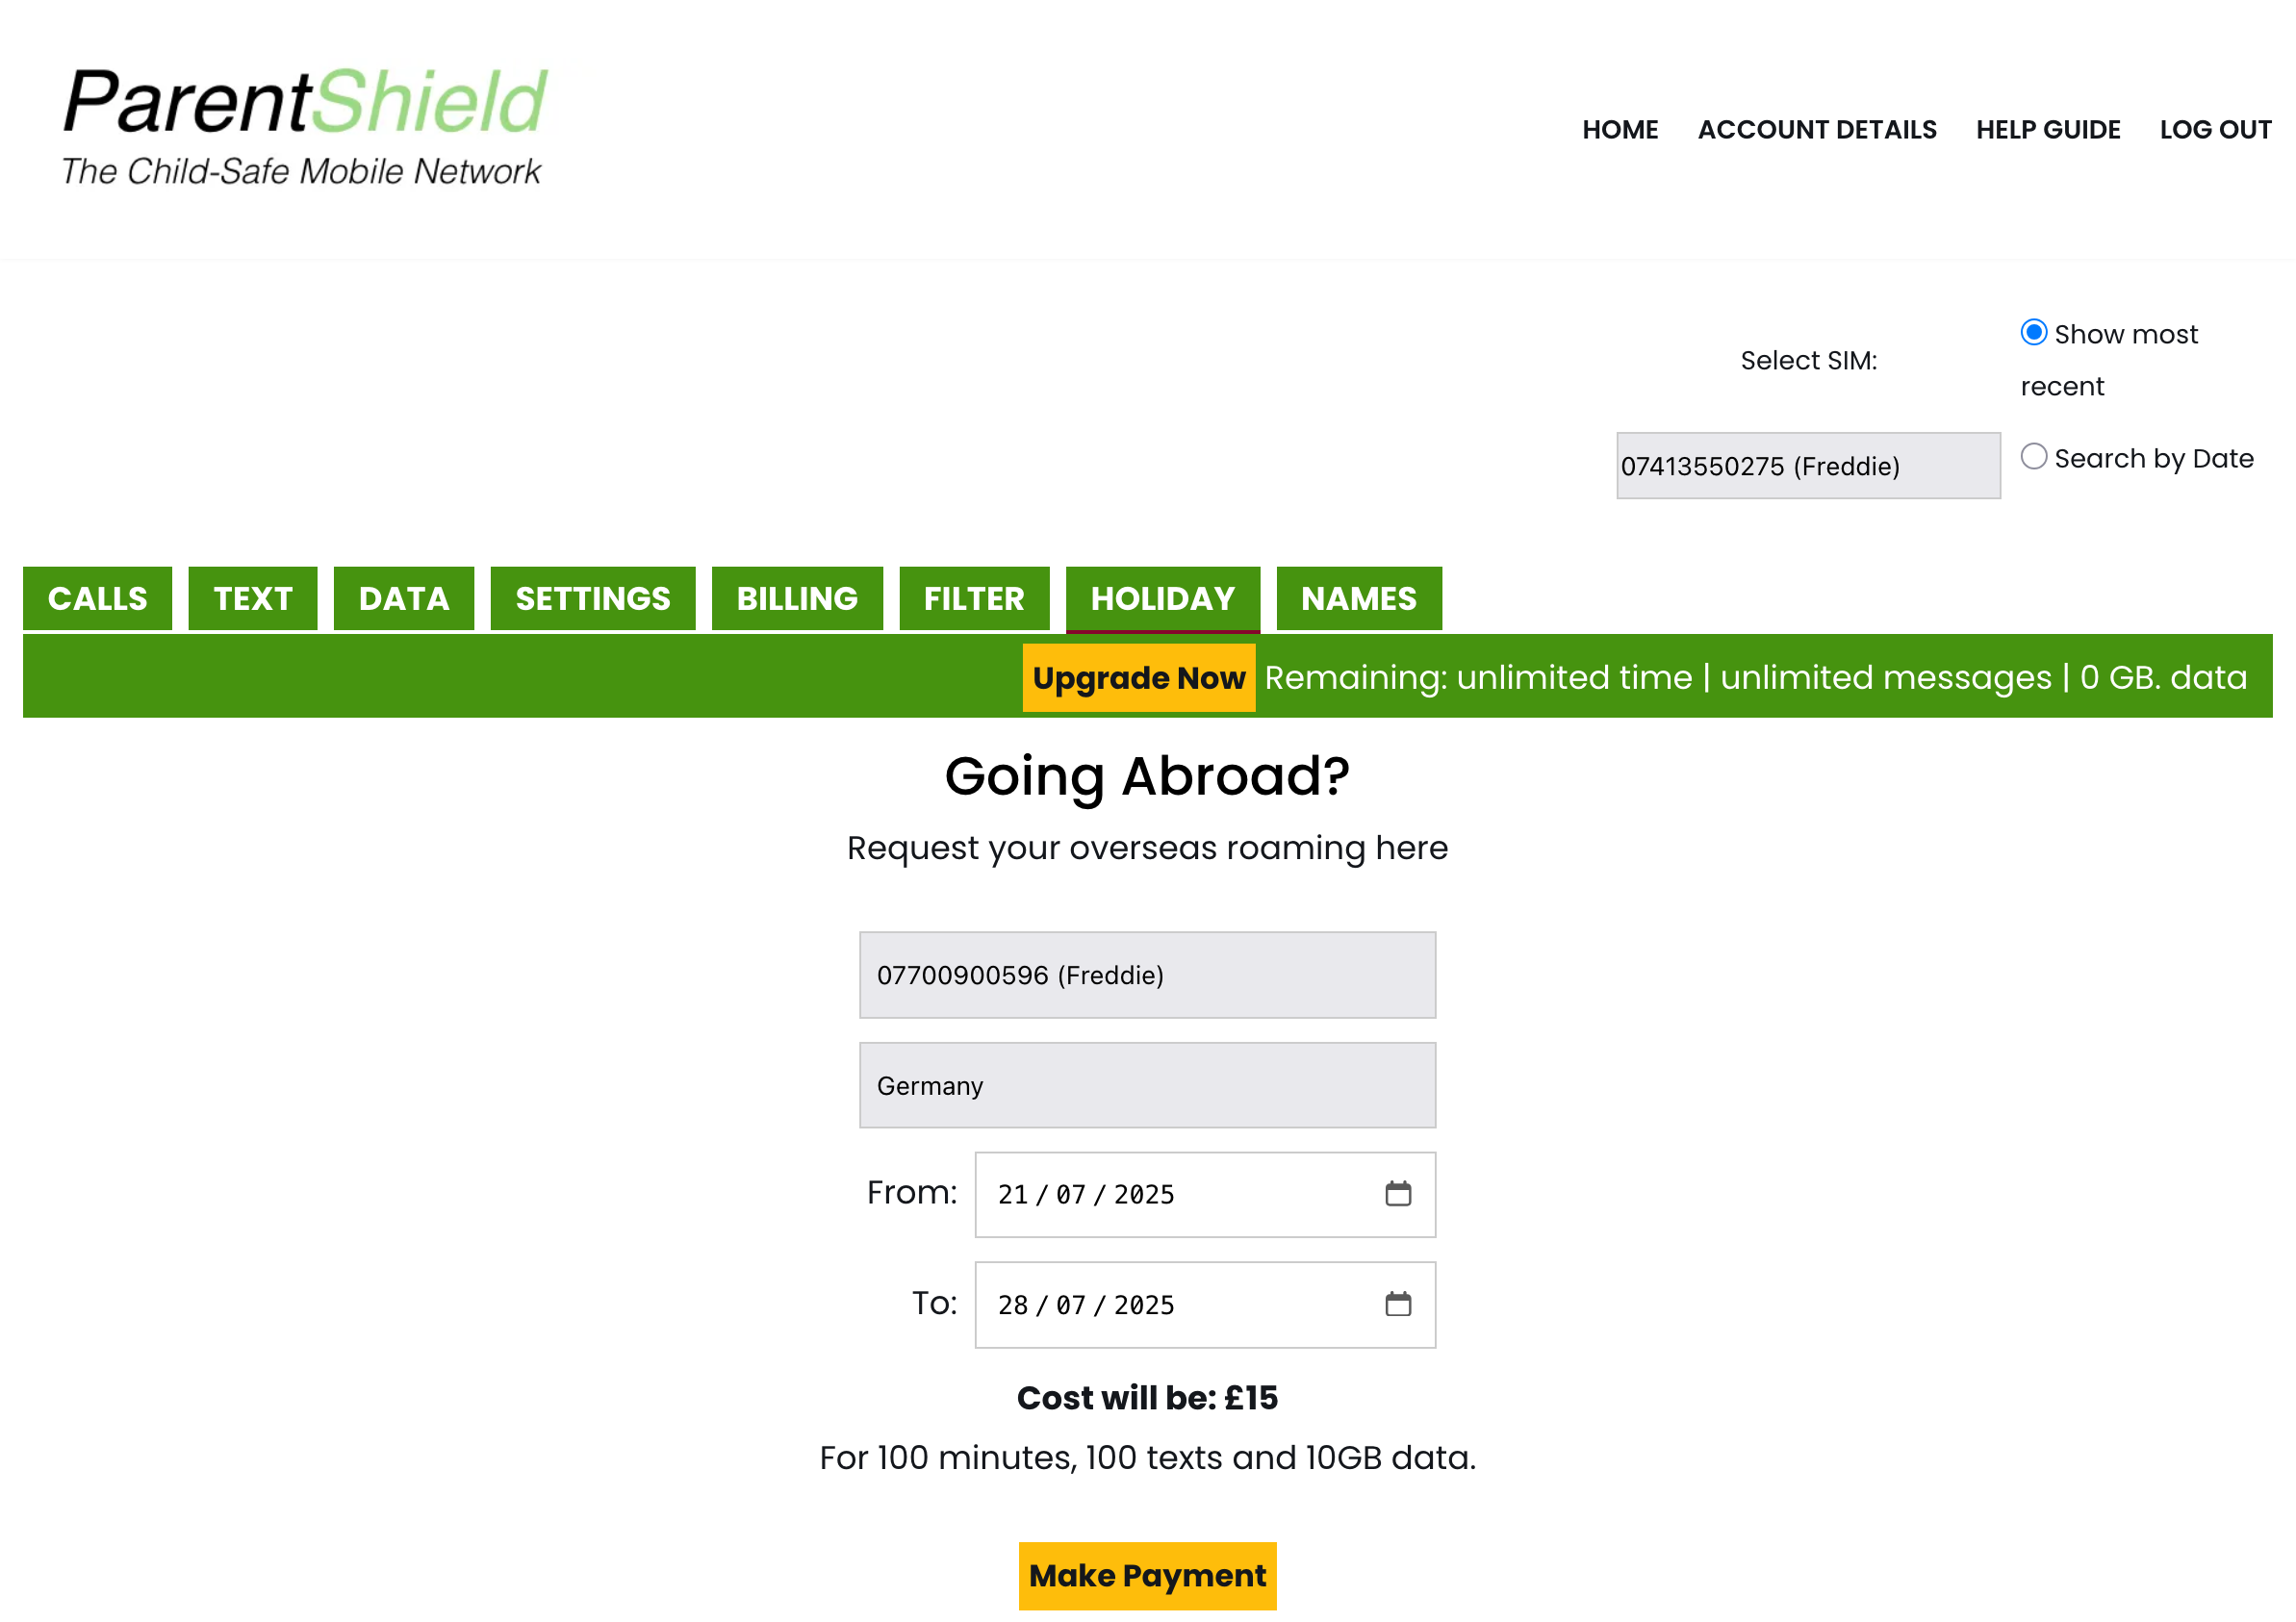
Holiday
The holiday tab is where you would book overseas roaming if going outside the UK. Simply select the SIM you want to book the roaming for, the country, and the to and from dates. You will see how much it will cost, and the allowances that will be available to use.
Once you've selected everything, press the make payment button to pay and book the overseas roaming. You will get an email 5 minutes after making the payment to confirm. Please note that the payment will initially go onto the balance on the account, and will then be removed 5 minutes later when the overseas roaming has been booked into the system.
Names
The last tab is the Names tab. This is useful for assigning names to the phone numbers, so you can more easily identify who is calling or texting back and forth. To add a new name, you can press the add new button and this will bring up number and name input boxes. You can then enter the phone number and name manually. Press the add new button for each new contact, and make sure to press the save button when you're done. Pressing the red bin button next to the name / name will delete the entry.
Please note that this names section is for display purposes only - adding numbers and names here will not allow or disallow contact with them, that's the ultra-secure section in the settings tab.
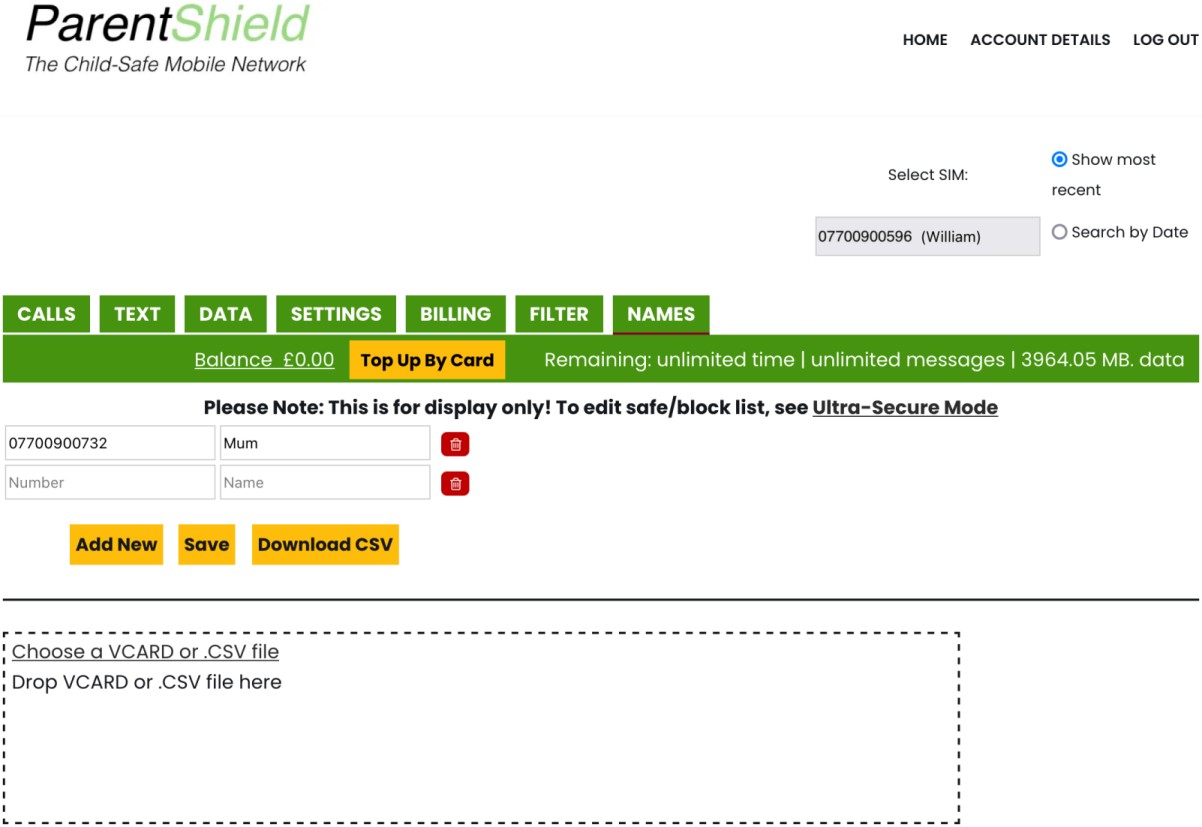
We recommend installing the ParentShield Portal as an app on your phone or computer before doing this. Please also note that the names are stored on your device in your web browsers local storage, so will not carry over if you log in on another device, and will be lost if you clear your browsing data.
After setting a list of names, you can press the download csv button to download a file that contains the numbers and names to your device. This will allow you to easily import the names again on another device, or if you clear your browsing history.
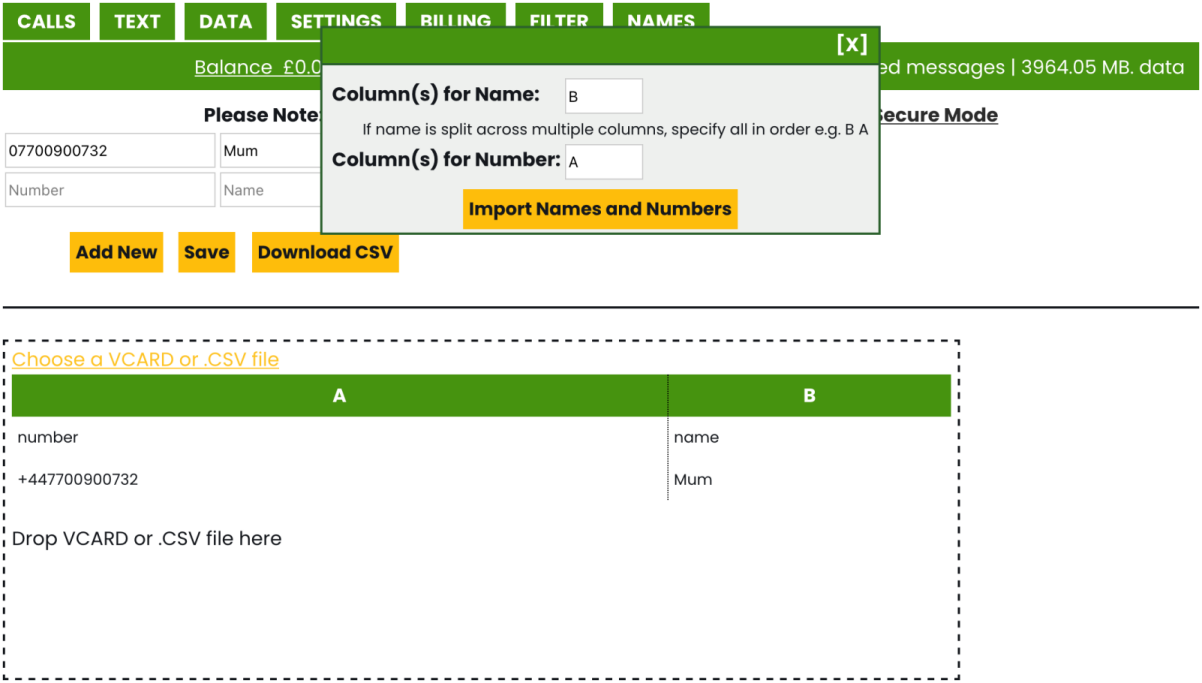
There is a section at the bottom of the page that says choose a VCARD or .CSV file. Pressing on this will let you import a VCARD (you can create these files if you export a contact from the address book on your phone) or a .CSV file. If you've input the names manually and used the download csv button in the ParentShield Portal, this will easily import as expected and you can press on the import names and numbers button to finish, then the save button. If you are importing a VCARD or have a .CSV file that has more than just a number and name column, a table will be shown with all the data. You will need to find the correct column letter at the top for the name and number columns and type these into the form (i.e. if the column for the name is labelled as A and the column for the number is labelled as D, you would type A into the column for name box, and D into the column for number box).
That's everything from start to finish to do with the ParentShield Portal. There are lots of powerful controls available, so don't fret if you feel a bit overwhelmed. We're almost always available to answer any questions or queries you might have. You can call us on 0330 122 1180, email us on hello@parentshield.co.uk or use the live chat button on the website. Feel free to come back and reference the documentation here at any time, and remember that if something is being blocked and you're not sure why, you can use the check what settings allow button at the bottom of the settings tab in the ParentShield Portal to get an overview of all the settings.